Sunday, July 25, 2010

Short post on navigating between views.

In this article, we will go through how to incorporate multiple views into our application. By default, creating a new View-based project in Xcode gives you a View. To create a second view, right click on classes, select Add new View class with xib file. That will give you a new ViewController class along with its xib file.

The below example code shows you how you can link your first view to your second view and back from second view to your first view. Remember to import the .h file of the View.

OctopusAnswer *octupusAnswer = [[OctopusAnswer alloc] initWithNibName:@"OctopusAnswer" bundle:nil];
[self.view addSubview:octupusAnswer.view];

octupusAnswer.answer.text = [tmpAns stringByAppendingString:@"!"];

// on the other form
[self.view removeFromSuperview];

Monday, July 19, 2010

I am on AppStore

Finally, my first app on AppStore. Check it out. 


Useful tool to use before deciding to buy that Punggol HDB flat or Weekend car


http://itunes.apple.com/sg/app/easy-loan-calculator/id381932538?mt=8


Sunday, July 18, 2010

Reading a Text File line by line and Tokenizing each line in Objective C

Here's a confirmed working code of how to read a file line by line and thereafter, tokenizing it. 


    NSString *path = [[NSBundle mainBundle] pathForResource:@"test2" ofType:@"txt"];
    NSString *string = [[NSString alloc] initWithContentsOfFile:path encoding:NSASCIIStringEncoding error:NULL];

    NSArray *lines = [string componentsSeparatedByString:@"\n"]; // each line, adjust character for line endings
    NSEnumerator *nse = [lines objectEnumerator];
    NSMutableArray *values = [NSMutableArray new];
    NSString *tmp;
    while(tmp = [nse nextObject])
    {
NSArray *chunks = [tmp componentsSeparatedByString: @","];
NSEnumerator *nse2 = [chunks objectEnumerator];

NSString *tmp2;
while(tmp2 = [nse2 nextObject]){
NSLog(@"%@",tmp2);
}
NSLog(@"%@", tmp);
    }

Thursday, July 15, 2010

Ask Octopus Paul

There was a recent rage over a Octopus called Paul. Now feel this rage over the iPhone. 
Lookout for the upcoming Ask the Octopus app! Free download. No superstition. Just for fine!

Using Two PickerViews together

Using two PickerViews together.

Expanding upon the previous tutorial, we will explore how to use two PickerViews together. Such is useful for ‘converter’ like applications, eg. currency converter, units converter.

Below figure shows an example of a bible units converter. that uses two PickerViews.

To have two PickerViews in your app, first drag and drop another PickerView into you xib file .. Declare the Outlet for it. Remember to click them to File’s owner.

The code where you have to edit are the below. Include an if-else condition based on the pickerView that triggered the method. I have two pickerViews, one named pickerView, the other pickerView2. Check which pickerView triggered the method, and set the corresponding label to the value of that particular pickerView.

- (void)pickerView:(UIPickerView *)thePickerView didSelectRow:(NSInteger)row inComponent:(NSInteger)component
{
if([thePickerView isEqual:self.pickerView])
mlabel.text= [arrayNo objectAtIndex:row];
else
mlabel2.text= [arrayNo2 objectAtIndex:row];
}

Have a similar if-else condition to return the no. of rows in each PickerView and also the title for each pickerView cell.
- (NSInteger)pickerView:(UIPickerView *)pickerView numberOfRowsInComponent:(NSInteger)component;
{
if([pickerView isEqual:self.pickerView])
return [arrayNo count];
else
return [arrayNo2 count];
}
- (NSString *)pickerView:(UIPickerView *)pickerView titleForRow:(NSInteger)row forComponent:(NSInteger)component;
{
if([pickerView isEqual:self.pickerView])
return [arrayNo objectAtIndex:row];
else
return [arrayNo2 objectAtIndex:row];
}

So there you go, how to use two picker Views together.

Monday, July 12, 2010

Playing Sound with button clicks - Vuvuzela App

In this article, we will doing an app that plays sounds when you click on button. Many hots apps that have been downloaded just leverage upon this simple idea. Get a funny/interesting sound, press a button (helps if you have an image for the button) and play the sound.

In this article, let's have an app that plays cute baby sound whenever a user clicks on a button. Create a new view-based application in xcode, then design a UI similar to the below in InterfaceBuilder. Take note that the images are actually buttons, where you just have to specify the image property of the button. The rest of the controls are basically labels.


In my app, I have four buttons. Of course one will do if that is a really cool sound, for eg. vuvuzela. Copy the below code as your ViewController.h file

#import <UIKit/UIKit.h>
#include <AudioToolbox/AudioToolbox.h>

@interface SysSoundViewController : UIViewController {
CFURLRef soundFileURLRef;
SystemSoundID soundFileObject;
}

@property (readwrite) CFURLRef soundFileURLRef;
@property (readonly) SystemSoundID soundFileObject;

- (IBAction) playASound;
- (IBAction) vibrate;
@end


Explanation:
We declare a CFURLRef which is a reference to a object representing access to a URL. It is useful as long as the resource you are accessing can be done via a URL. This CSURL object will later hold the URL to our sound files.

CFURLRef soundFileURLRef;

SystemSoundID represents a System Sound object.

SystemSoundID soundFileObject;

We next declare two Actions for linking to our buttons later on. One to play a sound, the other, to vibrate the phone.
- (IBAction) playASound;
- (IBAction) vibrate;

Copy the following code next for the ViewController.m file.

#import "SysSoundViewController.h"
@implementation SysSoundViewController

@synthesize soundFileURLRef;
@synthesize soundFileObject;

CFBundleRef mainBundle;

- (void) viewDidLoad {
[super viewDidLoad];
// Get the main bundle for the app
mainBundle = CFBundleGetMainBundle ();
}

// Respond to a tap on the System Sound button
- (IBAction) playASound {
// Get the URL to the sound file to play
soundFileURLRef  = CFBundleCopyResourceURL (mainBundle,CFSTR ("a"),CFSTR("wav"),NULL);
// Create a system sound object representing the sound file
AudioServicesCreateSystemSoundID (soundFileURLRef, &soundFileObject);
AudioServicesPlaySystemSound (self.soundFileObject);
}

// Respond to a tap on the Vibrate button
- (IBAction) vibrate {
AudioServicesPlaySystemSound (kSystemSoundID_Vibrate);
}

- (void) dealloc {
[super dealloc];
AudioServicesDisposeSystemSoundID (self.soundFileObject);
CFRelease (soundFileURLRef);
}
@end


Explanation:

The CFBundle allows you to use a folder hierachy called a bundle to organize and locate serveral kinds of resources like images, sounds or executable code. In our case, it represents the folder hierachy we have in the 'Resources' folder. Essentially, it provides us access to our Resources folder.

CFBundleRef mainBundle;

The viewDidLoad is the method that is called whenever the View loads. In it, we call the viewDidLoad of the parent class i.e. UIView.
- (void) viewDidLoad {
[super viewDidLoad];
Returns the application's main bundle. Or folder.
// Get the main bundle for the app
mainBundle = CFBundleGetMainBundle ();
}

Action linked to button.

// Respond to a tap on the System Sound button
- (IBAction) playASound {

CFBundleCopyResourceURL returns the location of the resource of name "a" and type "wav" from the mainbundle (Resource folder). Of course ensure that you have a “a.wav” audio file under ‘Resources’.

// Get the URL to the sound file to play
soundFileURLRef  = CFBundleCopyResourceURL (mainBundle,CFSTR ("a"),CFSTR("wav"),NULL);
AudioServicesCreateSystemSoundID creates a system sound object from the specified URL (first argument) and outputs it to the &soundFileObject. Notice that there is a & before soundFileObject. What that means is that we are passing the soundFileObject object reference to the method, such that when the method returns, it actually refers to a initialized soundFileObject.
// Create a system sound object representing the sound file
AudioServicesCreateSystemSoundID (soundFileURLRef, &soundFileObject);
Finally, AudioServicesPlaySystemSound plays a short system sound of 30 secs or less. 'self' simply means 'this'. The current object's soundFileObject.
AudioServicesPlaySystemSound (self.soundFileObject);
}

For this particular Action, we can the same method AudioServicesPlaySystemSound but the argument passed is different. When we provide the kSystemSoundID_Vibrate argument to it, it will invoke a brief vibration.

// Respond to a tap on the Vibrate button
- (IBAction) vibrate {
AudioServicesPlaySystemSound (kSystemSoundID_Vibrate);
}

Releases and disposes of the soundFile and soundFileURL objects.
- (void) dealloc {
[super dealloc];
AudioServicesDisposeSystemSoundID (self.soundFileObject);
CFRelease (soundFileURLRef);
}
 
Ensure that you link the buttons to the Actions as described in earlier tutorials and soon, you are on your way to doing your own vuvuzela app!

Sunday, July 11, 2010

Make your own Vuvuzela app

iPhone Screenshot 2

It’s an app that’s been downloaded 5 million times. So what’s so special about it? Other similar examples are the iFart app.
Essentially, both apps are just buttons with an image that plays a sound when clicked. So how hard can it be?

Will go through how to play an audio file soon. And you can be on your way to doing your own vuvuzela app.

Saturday, July 10, 2010

Making the keyboard disappear - Easy Loan Calculator Part 4

How do we make the keyboard disappear?

Surprisingly, the return/done key does not allow us to close the keyboard.

What we aim to achieve to do here is whenever the user clicks outside of any textbox, the key board will disappear. How do we do that?

In Interface Builder, create a button and stretch it over the entire screen. It should cover the entire screen. Go to Layout -> Send to back. The button should be send to the back.


Hence, whenever a user clicks outside the textbox, she is actually clicking on the background button.

Remember that we have actually declared an Action in the .h file.

-(IBAction) bgTouched:(id) sender;


We have also implemented it in the .m file. 


-(IBAction) bgTouched:(id) sender{
[tbxLoanAmount resignFirstResponder];
[annualInterestRate resignFirstResponder];
[noOfYears resignFirstResponder];
}

What we are doing is resigning control of all the textboxes whenever the background button is clicked. This is done via calling the textbox resignFirstResponder instance method.

Last by not least, in Interface Builder, connect the background button to the bgTouched Action and your Easy Loan Calculator is finally complete! Yes after four parts!!

Press Command -R to try.

Feel free to give comments.

Friday, July 9, 2010

Using Interface Builder to connect Outlets/Actions - Easy Loan Calculator Part 3
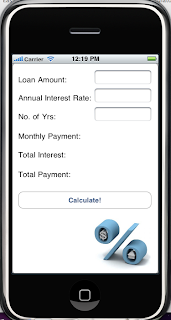
Essentially, we have implemented all the codes. In summary, we have declared Outlets which are references to our UIControls and Actions, which are events which we be triggered when we click on buttons.

Now we need to link the Outlets to the UIControls that we have designed in our xib file. 
Apple enforces a View-Controller-Model. Which is essentially keeping the UI layer and the business logic layer separate. Advantages are that we can change either layer without affecting much the other layer. i.e. if i were to change my UI drastically, my business logic layer can still link to the new UI with some re-linking.

Now it is this linking that we are going to do now. Linking the text boxes and labels to the Outlets we have declared earlier. (They are called IBOutlet because IB - Interface Builder)

In Interface Builder, you have these window with three icons in it. The view icon just opens your View. Ignore First Responder for now. 

Click on File's owner. Press and hold the Control key. Mouse click from File's owner to over the textbox. You should see a black box with drop down values of all the Outlets of textbox type that you have declared earlier.  See below. Click on the Outlet which should correspond to that textbox. You have just linked your Outlet to the textbox.


Continue for the rest of the text boxes and labels. Having done that, we now proceed to link the button to the Action that we have implemented. i.e. link the Calculate button to the Calculate method.

Click on the button. Press and hold the Control key, and drag and hold to File's Owner. A black box with drop down values of the Events should appear. Select the correct event. In this case, we select the btnCalculate action.
You can think of Events or Actions as the same thing. 


There you go, your Outlets and Actions are all properly linked. Just ensure that you save all your files with command-S. Build and Run with command-R and the iPhone simulator should appear with your loan application. =)


So you learned the important lesson of Outlets and Actions through this exercise. Essentially, its all about receiving/sending user input (Outlets), and event handling with buttons (Actions).

With this, you can go on and build many many other applications.

Now as you test your application, a terrible thing happens. Your keyboard does not go away! Shocking! isn't this intuitive that the keyboard should go away? How do we make it go away?

We will touch on that in the next article.

Objective C - Convert string to double and double to string Part 2 - Filler


Before we go on to part 3, let me stop to pause for an important part of the code and zoom in a little more. For in the code, we have done something important, converting double into a string, and string into a double.

Now i initially thought that a simple google search would return me the result but to my horror...it doesn't! Especially for the double to format to 2 dp and become a string.

So here goes...

double loanAmount = [tbxLoanAmount.text doubleValue];

Remember the above code? Its to the equivalent of double d = Convert.ToDouble(tbx.Text) in C#. Over here, we are calling the doubleValue method of the String (or rather NSString - NS = NextStep) class to convert the text box Text property into a double.

NSNumberFormatter *numberFormatter = [[NSNumberFormatter allocinit];
[numberFormatter setNumberStyle:NSNumberFormatterDecimalStyle];
[numberFormatter setMaximumFractionDigits:2];
We now create the NumberFormatter object. Again its prefixxed with NS - NextStep. This object will format our 1.234566 into a nice 1.23 format. Of course you can format to percentages as well. There are also other formatters like date formatters.

NSNumberFormatter *numberFormatter = [[NSNumberFormatter allocinit];

We create the NumberFormatter object here. In short, we are doing a NumberFormatter nf = new NumberFormatter() here. [NSNumberFormatter alloc] is for allocating memory to hold this object. init - initialization. You will see [[Object alloc] init] very frequently.

NSNumber *n1 = [NSNumber numberWithDouble:paymentAmt];

Next, convert the double into a NSNumber type with the above code. Again, in C#, it will be NSNumber n1 = NSNumber.numberWithDouble(payment); Yea, its a static method.


 NSString *paymentAmtString = [numberFormatter stringFromNumber:n1];
Finally, using the numberFormatter object, which takes in a NSNumber argument, we finally convert our double to a String. Which we can assign to a text box Text property as per below.

monthlyPayment.text = paymentAmtString;

So in summary, double -> NSNumber -> NSNumberFormatter -> NSString.

Unbelieveable right, the amount of work you need to convert a formatted double into a String.
Yea, still more unbelievable things to come.